Exploring Shake SDK-- Android
 7 min
7 min
Exploring Shake SDK-- Android
Introduction
Shake is a bug reporting SDK for iOS and Android apps. It’s a powerful tool that easily compares to other bug reporting tools like Instabug or Crashlytics. In this article, I’ll explore some of the main features of the Shake SDK, it’s benefits, and how you can integrate it into your Android Project.
With Shake SDK added to your app, your testers can report any bug in under 5 seconds. It will take all the extra info you as a developer need and send it to the Shake web dashboard:
Shake SDK automatically captures the following information:
- Tester’s device model
- app and OS version
- Current View
- history of taps
- internet connectivity
- CPU and memory usage
- list of granted permissions
- list of useful data & so on
Top Features
The following top features are listed below.
- Screen Recording
- Logs Captured
- Make your Own UI
Screen Recording
Screen Recording is the best feature, you can easily watch a 30-seconds video what a tester did before a report.
You can simply use this 👉.setAutoVideoRecording(true)
Logs Captured
Logs Captured is another cool feature of the Shake SDK from which you can automatically see a timeline of all user’s taps, their network traffic, custom events, and even download everything if you want to.
You can simply use this 👉 .log()
Make Your Own UI
I liked this feature most, This feature is used to report bugs from the background, without showing any SDK UI, called as the silent Reports.
You can simply use this 👉.silentReport()
Shake SDK Integration With Android
To Integrate the SDK in your Android Project we need to follow these below steps.
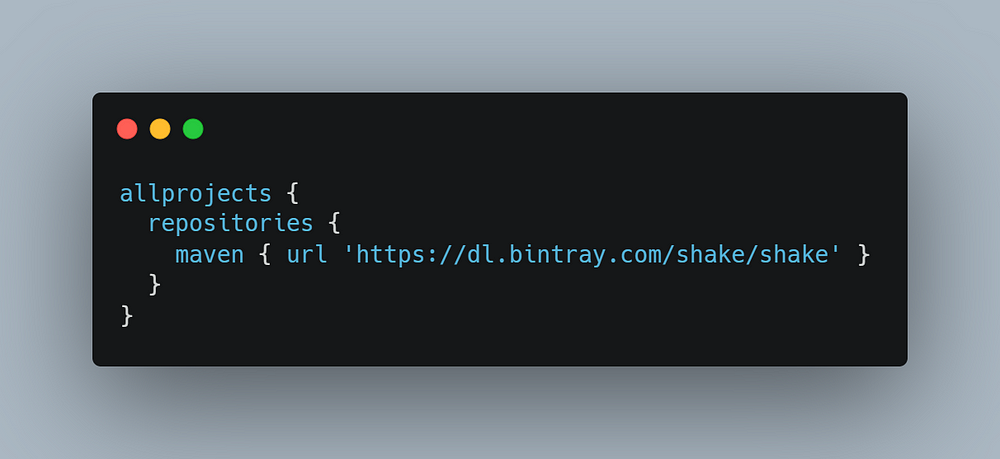
Step1: Add Maven Repository
First things first, we need to add a Maven repository to the top-level build.gradle like the below code snippet:

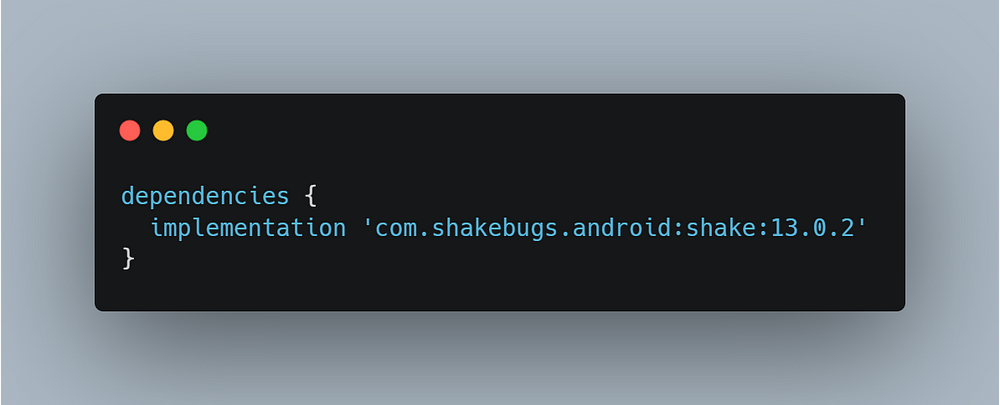
Step2: Add Dependency
Then, we need to add a Shake dependency in the build.gradle file, like the below code snippet:

Note: If you use Progaurd then don’t forget to add these rules. 👇
-keep public class com.shakebugs.shake.internal.data.** {
    public protected private *;
}
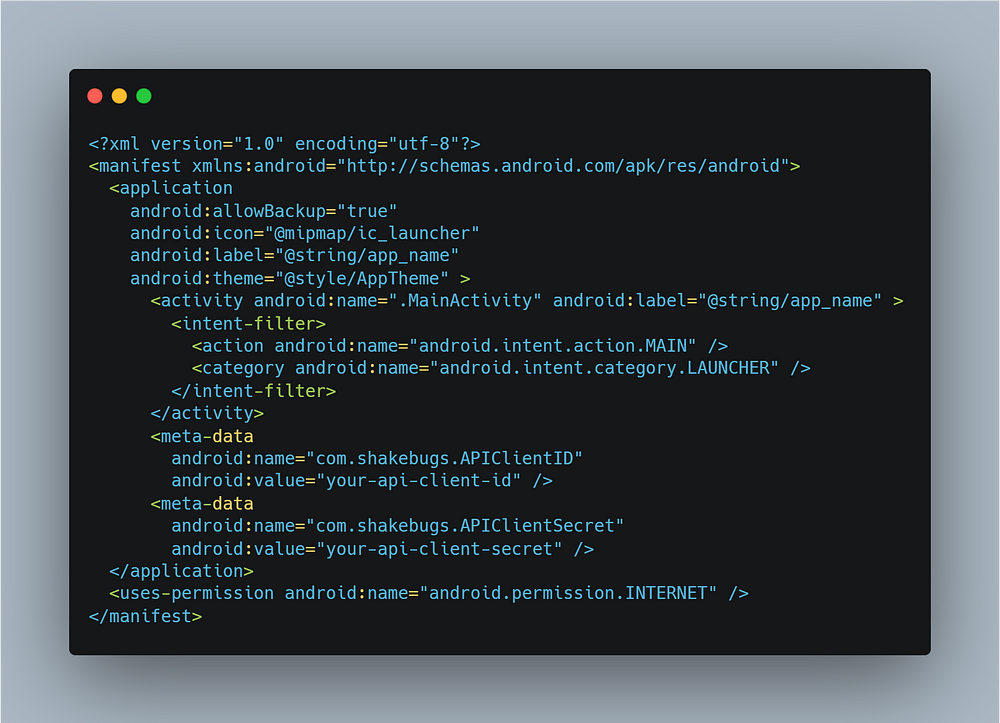
Step3: Add ClientID & ClientSecret
Add Client-Id and Client-Secret to AndroidManifest.xml file as metadata like below code snippet:
The Client-Id & Client-Secret you can find from here👉 workspace settings.

Step4: Add Service for Lower SDK Version
Targeting SDK version 28 and lower. The Shake SDK targets the latest Android version which is 29 (Android 10). If your app targetSdkVersion is 28 or lower(defined in your projects build.gradle) you have to add the service definition to your manifest file manually otherwise the build won't succeed. Open the Manfiest.xml file and add this 👇
<service android:name="com.shakebugs.shake.internal.service.ScreenRecordingService"
    tools:node="replace"/>
Note: If you target Android API 28 and lower and don’t add this service definition to your manifest you will get the following error:
AAPT: error: attribute android:foregroundServiceType not found.
Step5: Initialize SDK
After all the setup, we just need to Initialize the SDK in our Application class, like the below code snippet:
class App : Application() {
    override fun onCreate() {
        super.onCreate()
        Shake.start(this)
    }
}
Now, run your application and check the results.
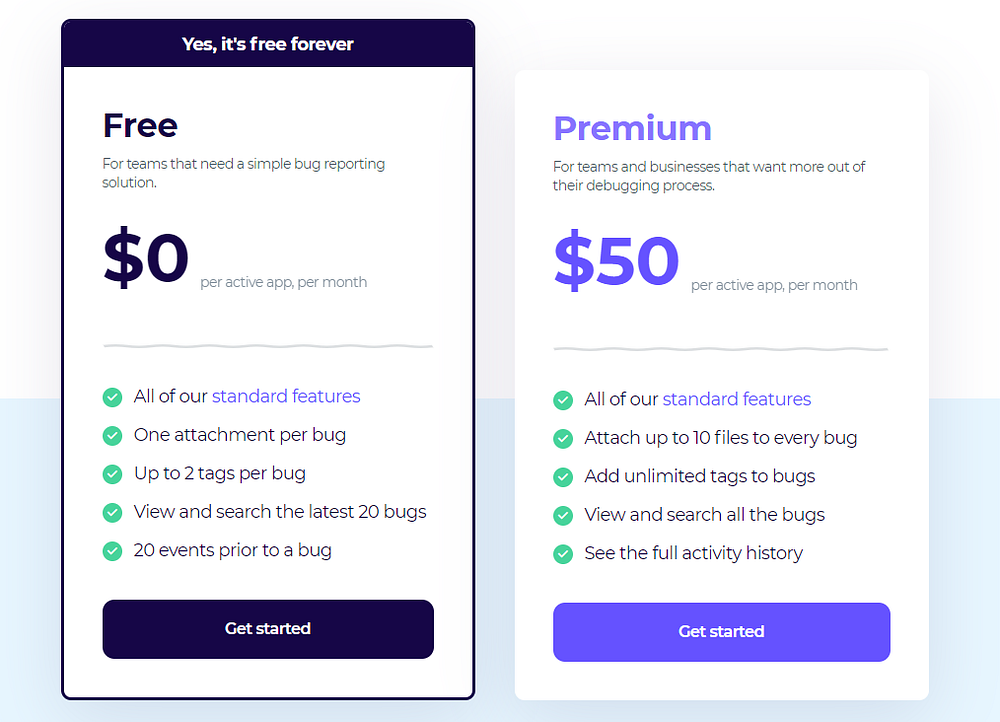
Shake SDK Pricing:
It has both the pricing models, Free & Paid & Of course, you can avail more features in the paid version. you can check the pricing from the below screenshot.

Note: At the time of writing, the pricing was $50, but you can check the latest pricing from the website pricing page.
Benefits:
Some of the following benefits I really wanted to share with you all about Shake SDK.
- fast and lightweight (It is perfectly responsive on devices running operating systems all the way back from 2012)
- No unnecessary dependencies (no unnecessary 3rd party dependencies)
- safety measures (to keep your data safe)
- Infinite team members (Invite as many members as you need)
- In-app bug inspects (It’s like right-click › Developer tools in your browser. But in your app. For free)
Conclusion
In this article, I explored the Shake SDK (A bug reporting tool), some of the main top features which the SDK provides, and also I also explained how you can easily Integrate Into your Android Project easily.
Compares to other bug reporting tools, I found Shake a very Impressive tool, to make developers' life easier.
With just seconds your app users can now report their problems easily.
I hope this article is helpful. If you think something is missing, have questions, or would like to offer any thoughts or suggestions, go ahead and leave a comment below. I’d appreciate the feedback.
I’ve written some other Android-related content, and if you liked what you read here, you’ll probably also enjoy these:
If you want to read more about, check out the official link below:
Sharing (knowledge) is caring 😊 Thanks for reading this article. Be sure to clap or recommend this article if you found it helpful. It means a lot to me.
If you need any help then Join me on Twitter, LinkedIn, GitHub, and Subscribe to my Youtube Channel.


 English
 Français
 Deutsch
 Italiano
 Español


 Contribuisci


 Puoi sostenere i tuoi scrittori preferiti


